Reseller: How to Customize Resold Client Logins
How to Create an Unbranded Control Panel Login Page for Resold Clients
- Go to Custom Formatting under Reseller Console.
- Under Additional Customization Features, click on Login Form.
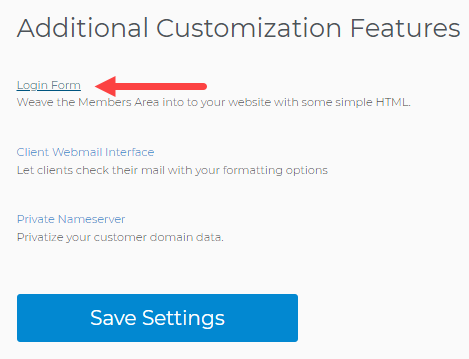
- Copy the Sample Code.
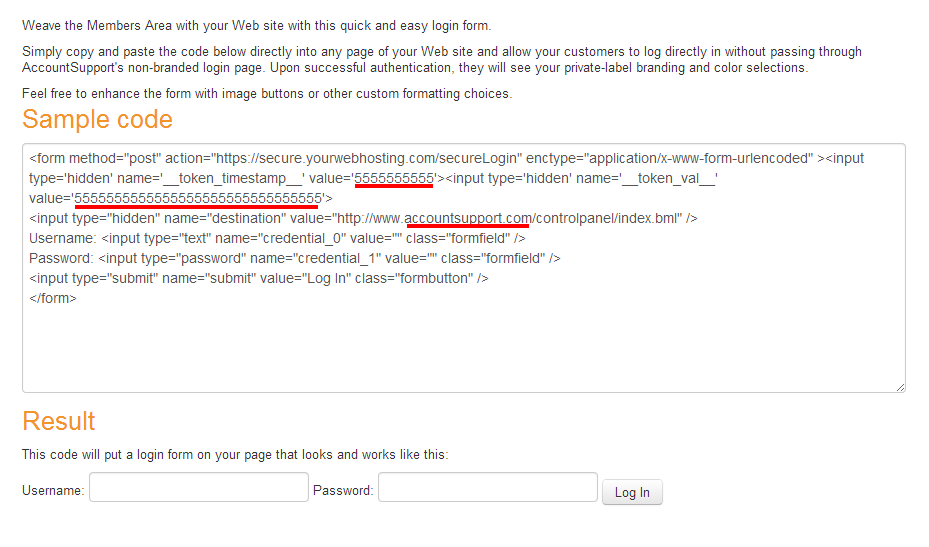 Important: The underlined sections of the sample code will be unique for your Reseller account.
 - Embed the sample code into your website.
How to Create an Unbranded Mailbox Login Page for Resold Clients
This walkthrough assumes that the domain you want to use for your email login screen is on your Reseller account.
- Log in to the Reseller Control Panel.
- Go to Domain Central and confirm where your domain is pointing.
- Go to File Manager.
- Locate and select the directory where your domain is pointing to.
- Click New Directory.
- Name the directory "mailadmin".
- Click Save.
- Select the /mailadmin directory you just created.
- Click New File.
- Name the file index.
- Set the Extension to html.
- Click Save to create the file.
- Click Edit for the index.html file you just created.
- In the popup editor that appears, copy and paste the following code:
<html> <head><title>Mail Admin</title></head> <script language=javascript> <!-- if (navigator.appName == "Netscape") { document.write("<frameset framespacing=0 border=0 frameborder=0 marginheight=0 marginwidth=0 rows='*,1'>") } else { document.write("<frameset framespacing=0 border=0 frameborder=0 marginheight=0 marginwidth=0 rows='*,1'>") } //--> </script> <frame src="login.html" border="0" marginheight="0" marginwidth="0" frameborder="0" scrolling="auto" name="app_hdr" noresize> <frame src="blank.html" border="0" marginheight="0" marginwidth="0" frameborder="0" scrolling="auto" name="app_body" noresize> </frameset> </html> - Click Save.
- Click New File.
- Name the file login.
- Set the Extension to html.
- Click Save to create the file.
- Click Edit for the login.html file you just created.
- In the popup editor that appears, copy and paste the following code:
<br>
<br>
<center>
<table>
<form method="post" name="login" enctype="application/x-www-form-urlencoded">
<tr>
<td colspan="2" align="center"><font face="Arial" size="5">Mail Admin</font></td>
</tr>
<tr>
<td>E-mail Address:</td>
<td><input type="text" name="credential_0" value="" size="30" maxlength="128" class="formfield"></td>
</tr>
<tr>
<td>Password:</td>
<td><input type="password" name="credential_1" size="20" maxlength="50" class="formfield"></td>
</tr>
<tr>
<td><input type="submit" name="Log In" value="Check Mail" onclick="javascript:login.action='http://www.accountsupport.com/mail/index.bml?s=1';javascript:login.destination.value = '/mailadmin/index.bml?check=1';" ></td>
<td><input type="submit" name="Log In" value="Manage Mail" onclick="javascript:login.action='https://secure.accountsupport.com/mailLogin';javascript:login.destination.value = '/mailadmin/index.bml?manage=1';"></td>
</tr>
<input type="hidden" name="destination">
</form>
</table>
</center>
Important: You may need to trade out the highlighted "accountsupport.com" values for "YourWebHosting.com". - Click Save.
- Click New File.
- Name the file blank.
- Set the Extension to html.
- Click Save to create the file.
- Test to make sure everything works by going to your domain followed by "/mailadmin" (example: your-domain.com/mailadmin).
How Can I Customize the Unbranded Webmail Login Page
To customize the webmail login screen, modify the HTML and CSS associated with the index.html and login.html files mentioned in the instructions above. Here is a visual example of what you can do to customize your webmail login screen:
Before...

After...

If you do not know how to make these types of modifications yourself or you simply do not want to make them yourself, feel free to contact us to learn more about iPage's professional services. Note that design services and professional services are paid services.
