Email Client Setup: Outlook 2013
How to set up your email with Outlook 2013
- Step by Step Walkthrough (POP)
- Step by Step Walkthrough (IMAP)
- Email Client Setup: Comparing POP vs. IMAP
Pro Tip: Before you set up your email client, check out our professional email and productivity plans — Microsoft 365 or Google Workspace. You’ll enjoy a domain-matching email address and a robust set of tools and applications to help you run your business more efficiently.
Step by Step Walkthrough (POP)
You will need your incoming mail server, outgoing mail server, full email address, and your email password. The default settings are listed below.
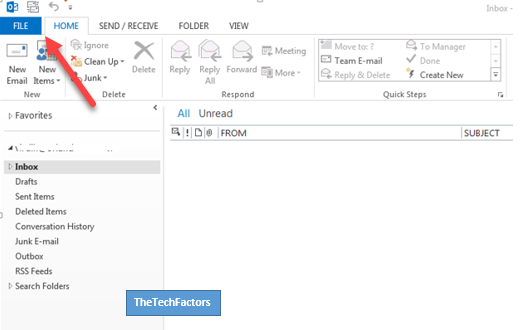
- Open Outlook 2013 and select the File menu.
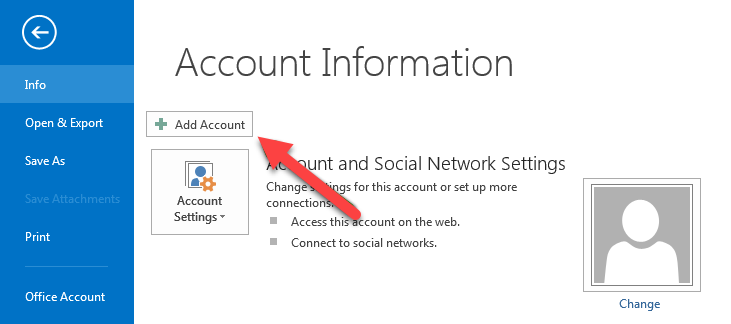
- Choose Info and click Add Account.
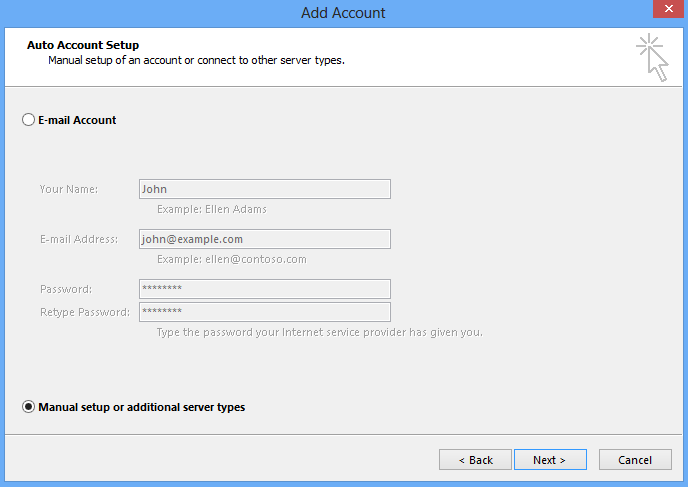
- Choose Manual setup or additional server types and click Next.
- Choose POP and click Next.

- Fill in the following information:

- Your Name: The name to display on your email.
- Email Address: Your full email address
- Account Type: POP
- Incoming Mail Server: pop.ipage.com (Note: You would not enter example.com but ipage.com)
- Outgoing Mail Server (SMTP): smtp.ipage.com (Note: You would not enter example.com but ipage.com)
- User Name: Your full email address
- Password: Your emailpassword
- Remember Password: We recommend having this checked.
- Require logon using Secure Password Authentication (SPA): We recommend having this unchecked.
- Click More Settings.
- Go to the Outgoing Server tab, and check the "My outgoing server (SMTP) requires authentication" box, then select "Use the same settings as my incoming mail server."

- Go to the Advanced tab, and fill in the following information:
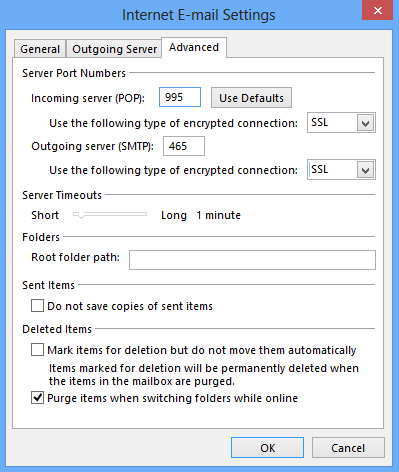
- Incoming Server (POP Port): 110
- Use the following type of encrypted connection (Incoming): Optional. If enabled, change Incoming Server (POP Port) to 995.
- Outgoing Server (SMTP Port): 587
- Use the following type of encrypted connection (Outgoing): Optional. If enabled, change Outgoing Server (SMTP Port) to 465.
- Click OK and hit Next.
- Click Finish.
Step by Step Walkthrough (IMAP)
You will need your incoming mail server, outgoing mail server, full email address, and your email password. The default settings are listed below.
- Open Outlook 2013 and select the File menu.
- Choose Info and click Add Account.
- Choose Manual setup or additional server types and click Next.

- Choose IMAP and click Next.
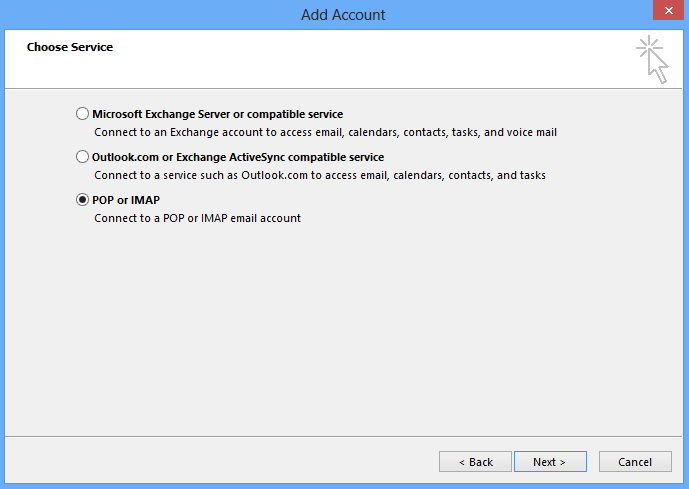
- Fill in the following information:
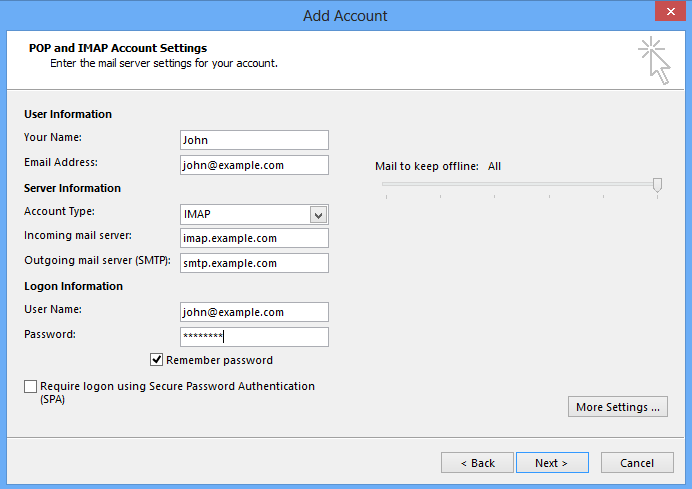
- Your Name: The name to display on your email.
- Email Address: Your full mailbox address
- Account Type: IMAP
- Incoming Mail Server: imap.ipage.com (Note: You would not enter example.com but ipage.com)
- Outgoing Mail Server (SMTP): smtp.ipage.com(Note: You would not enter example.com but ipage.com)
- User Name: Your full email address
- Password: Your email password
- Remember Password: We recommend having this checked.
- Require logon using Secure Password Authentication (SPA): We recommend having this unchecked.
- Click More Settings.
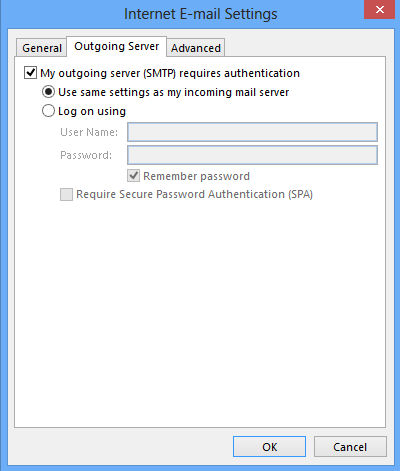
- Go to the Outgoing Server tab, and check the "My outgoing server (SMTP) requires authentication" box, then select "Use the same settings as my incoming mail server."
- Go to the Advanced tab, and fill in the following information:
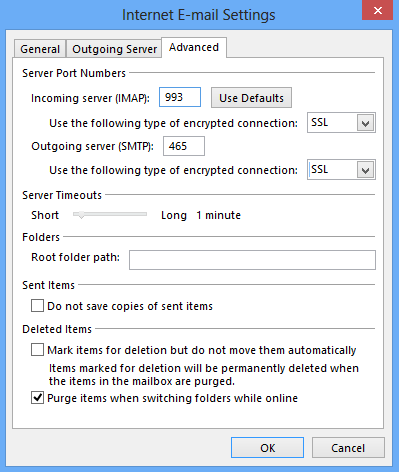
- Incoming Server (IMAP Port): 143
- Use the following type of encrypted connection (Incoming): Optional. If enabled, change Incoming Server (IMAP Port) to 993.
- Outgoing Server (SMTP Port): 587
- Use the following type of encrypted connection (Outgoing): Optional. If enabled, change Outgoing Server (SMTP Port) to 465.
- Click OK and hit Next.
- Click Finish.
- Refer to the generic troubleshooting steps for email client setup.
- Consult Microsoft's support page for Outlook 2013.
- Contact us so that we can help you troubleshoot the issue.
